Overview
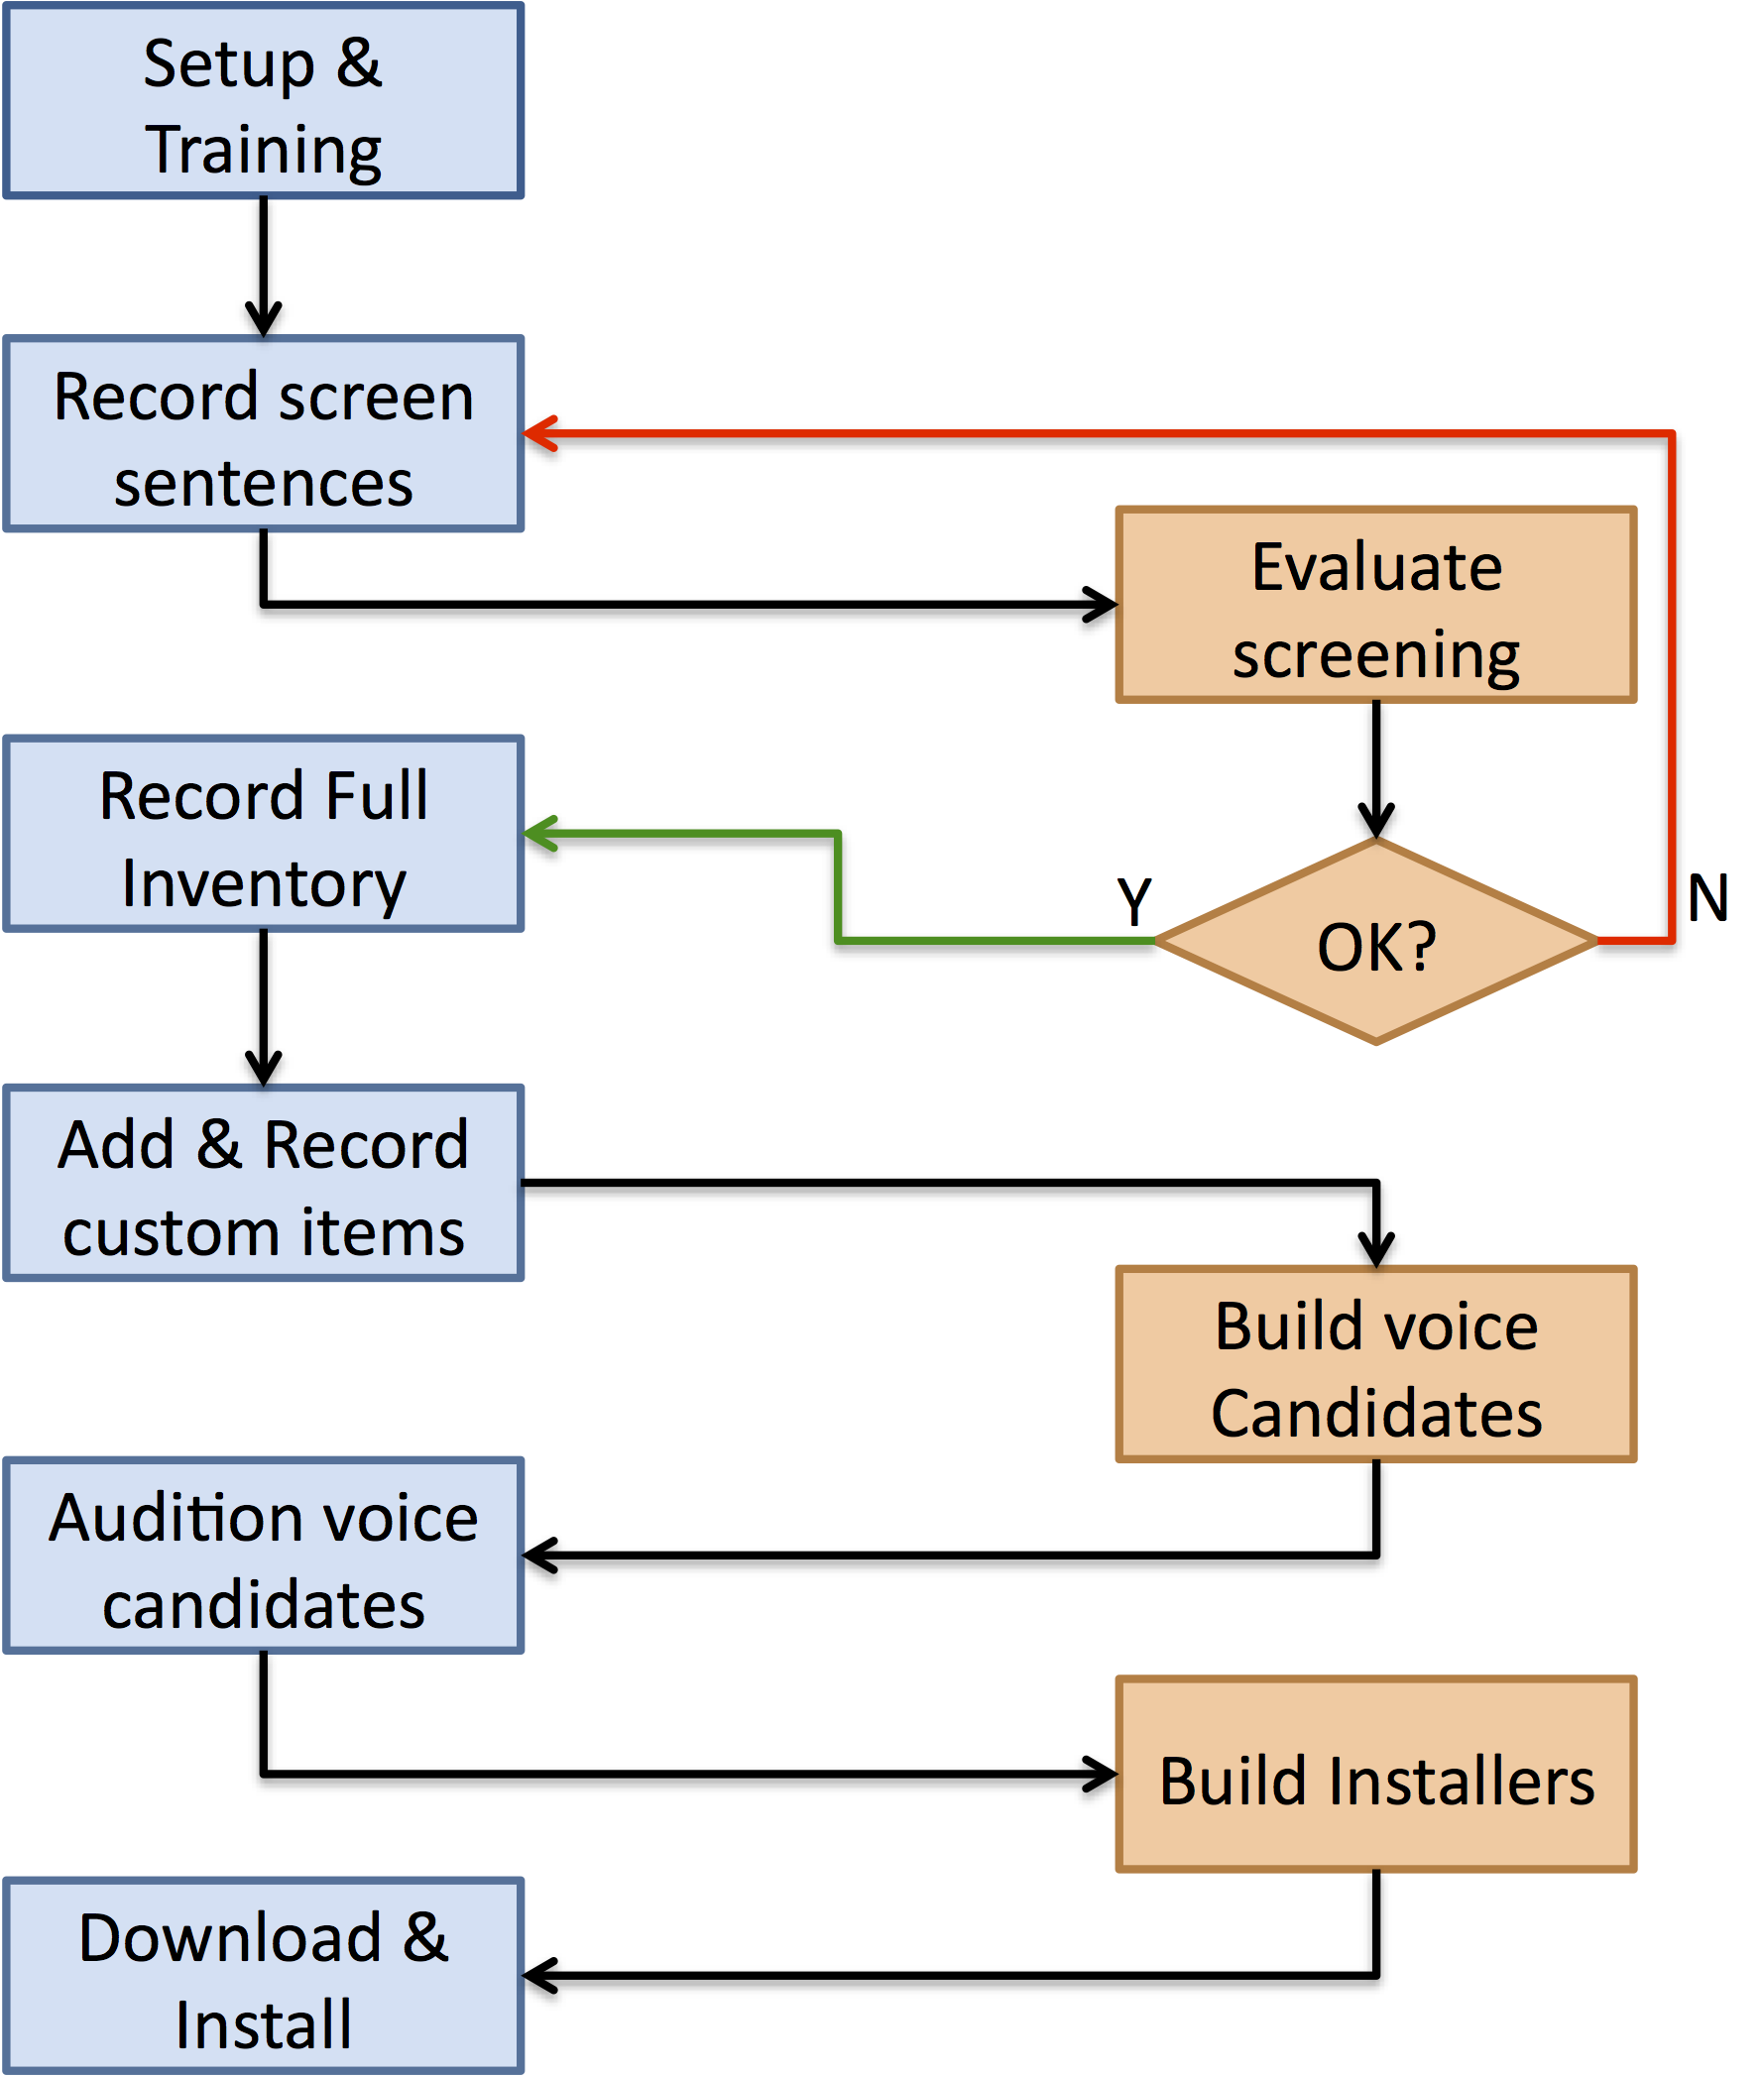
This flowchart shows the main steps that you will follow in creating your ModelTalker voice. The blue boxes on the left are the things you will be doing, while the orange boxes on the right are the things we need to do. You are in the Setup & Training step right now. Once you have completed that process, you will record 10 “Test” sentences for screening purposes. The Test recordings will be reviewed by our lab staff. We check your recordings mainly for two things: the audio quality; and your speaking style. Don’t be surprised (or dismayed) if we ask you to redo the same test sentences a time or two. Voice banking is a lot of work for you, so this process is all about helping you to make the most of that effort and achieve the best outcome.
Once approved for recording, you can proceed at your own pace to record a full voice-banking inventory of sentences. Our older “standard” inventory has 3155 sentences. That’s roughly two hours of running speech at a normal speaking rate, but it would take you much longer than two hours to record all of them, probably 12 to 16 hours if you are able to speak fluently and don’t make many mistakes. If your speech is mostly normal, the more you record the better your voice will sound, but you do not need to complete all the sentences unless you want to. We can build a voice with as little as 400 sentences, but the more you record, the better the quality of the voice. Based on one study, reasonable intermediate stopping points would be 400 sentences for a minimal voice, 800 sentences for a voice that has improved intelligibility, and 1600 sentences for more natural-sounding prosody. However, everyone’s speech is different, so these are only rough guidelines.
NEW: As our technology has improved over the years, the amount of recording needed has significantly decreased. You now have the option of choosing our latest “Gen3” inventory, which consists of only 300 sentences designed to elicit more expressive speech that we can model with our new generative AI technology. A fluent speaker can record this in 1-2 hours on a single day. We could easily create very realistic personal voices with fewer than half that number of recordings, but with the 300 sentences we are able to capture more of each individual’s expressive speech qualities.
In addition to the standard and Gen3 inventories, there is a custom inventory to which you can add your own phrases and special words such as the names of people close to you, e.g. for “message banking.” A web form will allow you to enter lists of person, place, or object names and a list of custom sentences or phrases to record. Recordings of these phrases are stored in the synthesis database in a way that will let them be synthesized virtually exactly like your recording. Each of the person/place/object names is embedded in multiple brief sentences for recording.
If your speech is somewhat affected by ALS/MND you should probably break the recording up into many short recording sessions, once a day at the same time when your speech is strongest. We do not actively monitor your recording while you are doing this, so you will also need to listen frequently to your recordings to make sure the audio continues to sound just like it did when you started. If you have any concerns, you should contact us.
When you have completed as many recordings as you desire and clicked the “Build My Voice” button in the online recorder interface, the website will notify our lab staff, who will process your recordings to construct multiple versions of your synthetic voice. These versions differ in the way your recordings are processed to form the voice.
All these “candidate” versions of your voice will be installed on the web server for you to “audition”. You will be able to select options for synthesis (speaking rate, intonation and timing controls), and to compare all the voices with each other in a structured listening task. See our explanation of this in the audition description. The result of this is selection of a final voice version and synthesis parameter settings that are used to create voice installers for you.
Requirements
Web browser: The web recording tool only works with the Chrome web browser (you cannot use it in Safari or Internet Explorer and recent versions of Firefox have been very troublesome). You will need to install Chrome if you have not already done so.
- If you need to download and install Chrome, click here.
Microphone: Unless you are a professional working with professional equipment, we require the use of a wired, head-mounted microphone with a USB interface. There are three important advantages to using a USB headset:
- The headset will maintain a constant distance and orientation between your mouth and the microphone. This is extremely important for consistency from one recording to the next.
- Many computers, especially laptops, have less-than-optimal sound cards. A USB mic will have its own built-in sound processing hardware that will bypass the sound system of your computer.
- A headset mic is less likely to pick up ambient noise.
Several consumer-grade USB headsets will be acceptable, but do not go for the least expensive headsets because their audio quality will not be good enough. Based on current prices in the US, expect to spend $40 – $50 USD or more for a basic good quality headset. Our Help Center has a section on currently recommended microphones that we update as we learn about new models we can recommend. It is also worth noting that USB headsets are strongly preferred over the type with a small phone plug. If you are using a USB headset, our software can identify the microphone and make sure it is being used for every recording session. The phone plug type connection is not typically identifiable by our software and places an additional burden on you to make sure that your audio is configured correctly before recording.
Do not bother to try recording with a desktop microphone or (even worse) your computer’s built-in microphone; it will not be possible to obtain acceptable recordings. If you have professional-grade audio equipment that you would like to use for recording, please contact us to discuss the best way to use the hardware.
Recording location: You should choose a room in which you can minimize all sources of background noise. If there are other people in the house while you record, make sure you can’t hear them talking or the television in another room. Close the windows to avoid noises from outside. Make sure any phones or other devices are on silent. Watch out for and eliminate less obvious sources of background noise, like fans, forced-air heat, air conditioners, or other appliances.
Also, the room you are recording in may be shielded from outside noise, but the room itself can cause the sound of your voice to reverberate off of hard surfaces and create echo in your recordings. Rooms with vaulted ceilings, hardwood, tile, or marble floors should be avoided. A small room with carpet and curtains is preferable. If you have a walk-in closet, that may be ideal.
If you are stuck with a reverberant room, it may help to place blankets on the floor when recording in order to absorb some of the sound. If you have a room divider screen, setting that up in a U or semi-circle shape so that you are facing the inside of the U and draping blankets over the screen to further improve sound damping can help a lot. In the worst case, a trick that radio professionals sometimes use in unfavorable recording environments is to drape a blanket or quilt around the person with the microphone to help damp out other sounds and echoes.
Once you have Chrome installed on your computer, you have a USB headset, and you are set up with your computer in your recording location, you might need to make some audio configuration changes to your computer. To help with configuration, we have a check list for Windows PCs and a check list for Macs that you can use to make sure your audio is correctly configured.
When you think your audio is configured correctly, click Continue and we will start by measuring the background sound level in your room (i.e. the silence) to be sure the environment is going to be acceptable for speech recording.