NOTE: New users looking for instructions for how to get started recording with ModelTalker should begin at this link.
The figure below is an overview of the online recorder:
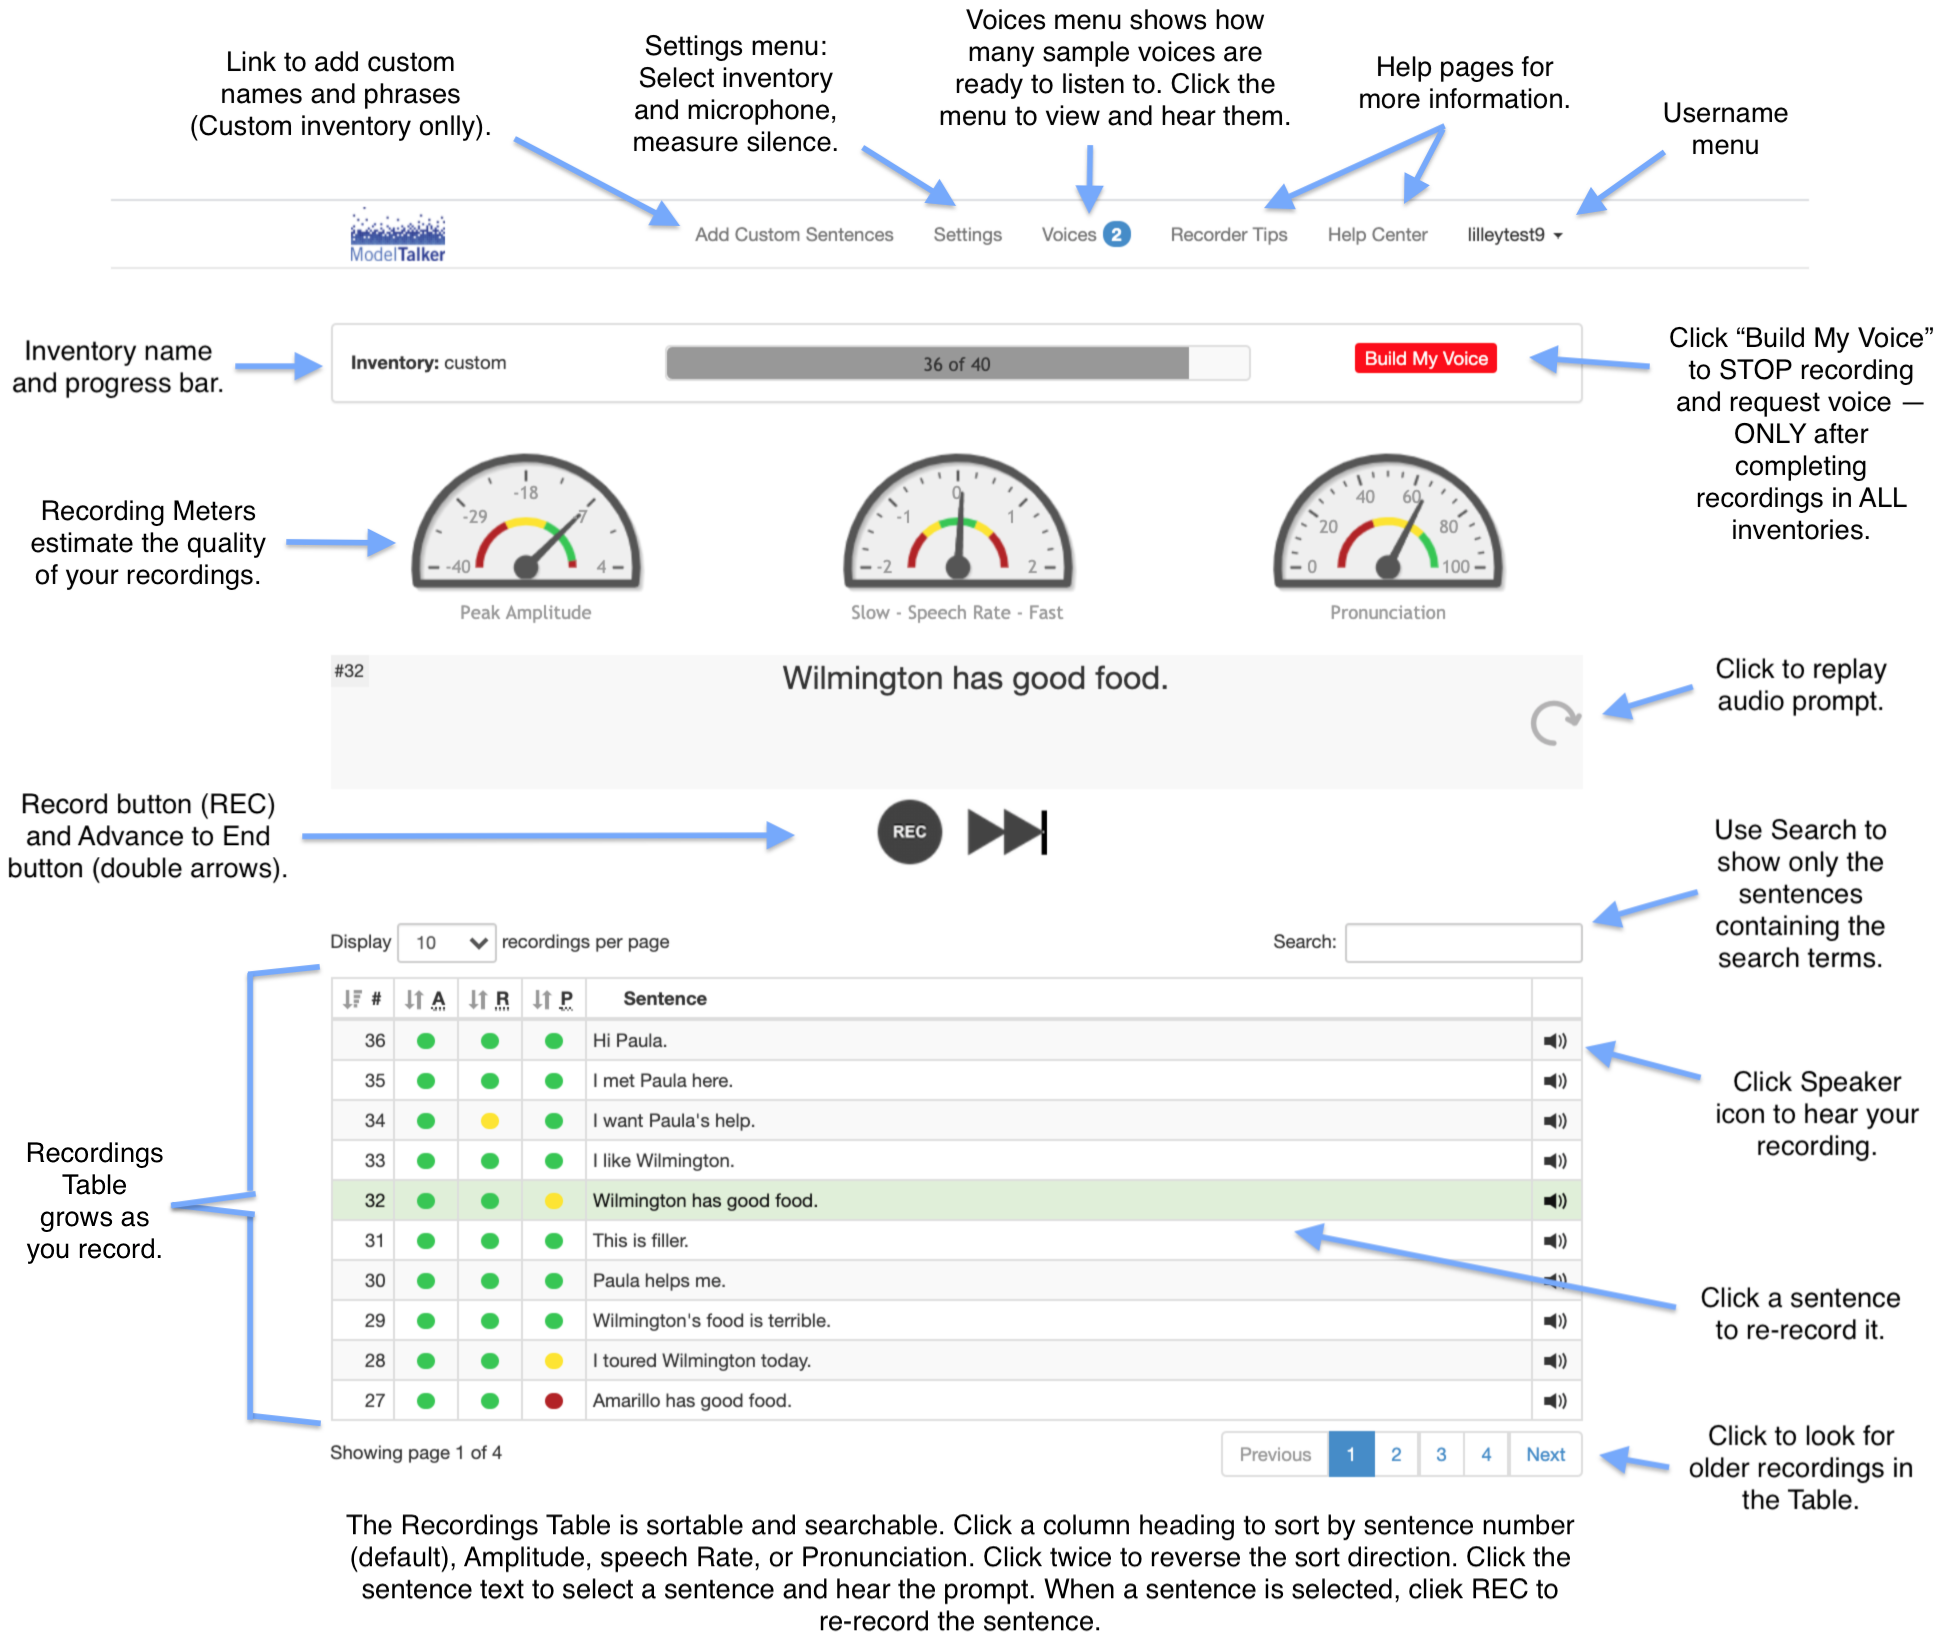
In addition to the brief pointers in the figure above, there are a few less obvious things to keep in mind:
The Listen menu
As you are recording, our system will construct crude sample versions of your synthetic voice that you can listen to at regular intervals. The first one will be built shortly after you record 25 sentences, the second at 50, and so forth (with progressively longer intervals between new samples). The number beside the word “Listen” indicates how many different versions are available to listen to, and will briefly flash when a new version is available. To listen to one of them, click the Listen menu, select a version from the dropdown menu, type any sentence into the text box, and click the button. Please note: These samples are built using default parameters and an older synthesis technology; if you are recording our new “Gen3” inventory, the samples may sound particularly poor. Your final voice that we will construct for you offline after you’ve finished recording may sound substantially better than these samples, particularly if you have recorded the “Gen3” inventory.
Custom sentences
The “Add Custom Sentences” menu option will only be available in the Custom inventory (accessible from the Settings menu). Clicking this link will take you to the Custom Inventory Tool, where you can add names, phrases, and personal messages to the end of the Custom inventory sentence list.
The Recordings Table
Notice that both the Amplitude and Speaking Rate meters have “green” ideal regions with “yellow” or “red” ranges on both sides of the green region. There are two ways that amplitude can be bad: it can be too quiet, or two loud. Similarly, your speaking rate could be either too slow, or too fast. So for example, a sentence flagged with a red dot in the recordings table for speaking rate might mean that the sentence was too slow or that it was too fast. If you hover the mouse over each dot next to a sentence, it will show you the actual value of the meter that gave rise to the dot color. Further, if you click on the sentence in the table, it will (a) play the prompt, and (b) set the meters in the display to the values that were obtained from your recording of the sentence. And of course, you can also hear your own recording by clicking the speaker icon.
When you click one of the score column headings (A, R, or P) it sorts all of your recordings by that measure (Amplitude, speech Rate, or Pronunciation). For instance, if you click the R column heading, the sentences will be sorted so that sentences with speech rates furthest from the ideal rate will be at the top of the first page of the table, and all the sentences with rates closest to ideal will be at the end of the last page of the table. So, even though one sentence may have a red flag because it was too slow, and another because it was too fast, both will sort to the top of the table because they are far from the ideal rate.
If you have selected a sentence somewhere in the middle of the list of recorded sentences, recording it will not automatically advance you to the next sentence as usual. However, the Advance to End button (double arrows), which is normally deactivated, will be activated. Clicking that button will return you to the next sentence you need to record, play the prompt for that sentence, and re-sort the table to its default sort order, which always places the last sentence you recorded at the top of the first page of the table for easy access. As soon as you record a new sentence, it will appear at the top of the table, making it easy for you to click that sentence and redo it if you know you made a mistake.
For most efficient recording, we recommend that–unless you know you made a mistake or stumbled on a sentence–you progress through the recordings (the system automatically advances) even if the score for a particular recording was not great. Later, say at the end of a recording session, or just before requesting your voice, you can use the Recordings Table to review previous recordings, find those that are most problematic and redo them. The table makes it easy for you to do this. We encourage you to re-record sentences that have “red flags” (and maybe some yellow flags), BUT ONLY IF YOU FEEL YOU CAN IMPROVE ON YOUR EXISTING RECORDING! The amplitude measure is very reliable, so if you have a sentence that was flagged red for amplitude it is probably a good idea to try to redo it. We are more concerned about consistency in speaking rate than your absolute speaking rate, so you should only worry about sentences that are extremely deviant in speaking rate. For sentences that were flagged as having poor pronunciation, before deciding to redo the recording, listen carefully to your existing recording and compare it to the prompt. If your existing recording has any audible problems that you can correct, it is good to try to redo the recording. But if it sounds right to you, don’t worry about it! Our software will try to use every sentence you have recorded regardless of its score.
The “Build My Voice” button
The “Build My Voice” button only appears in the Standard, Gen3, or Custom inventories. Since we want you to have the opportunity to re-record sentences or add custom sentences, we do not automatically start building your voice when you reach the end of the list. So, when you have completely finished recording (or decided you can’t record anymore), YOU NEED TO LET US KNOW YOU’RE DONE by clicking the “Build My Voice” button. This will take you to a confirmation page that will show you the number or recordings you’ve made in all your inventories, and then ask you to confirm that you’re done. Once you’ve confirmed, we will begin building your final synthetic voice. CLICKING THIS BUTTON WILL PREVENT YOU FROM DOING ANY FURTHER RECORDING, in any inventory, including custom sentences, now or in the future, so you need to be sure you’re completely done before clicking it! (If you want to hear samples of your synthetic voice while you’re recording, check out the Listen menu above.)